Category: Help

Twitter Tools

From CUNY Academic Commons

Based on Matt Gold’s post “How to Create Blog Subscriptions”.

The Twitter Tools Plugin, which again is available from the dashboard of your blog, allows you to connect your blog posts to a twitter account. You can create an automated process so that every time a new blog post is published on your blog, an update with a link is posted on Twitter.

When you set up this plugin, be sure to go back into your twitter tools setting to make sure that the Application Type has read and write access (http://wordpress.org/support/topic/plugin-twitter-tools-it-works-make-sure-twitter-application-has-read-and-write-access).

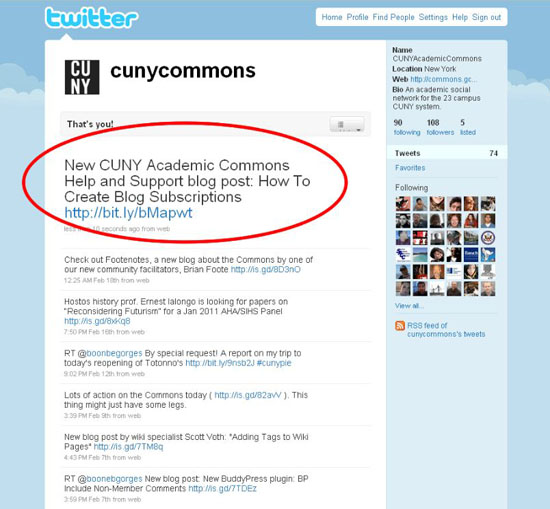
Here’s a screenshot that shows the look of the resulting twitter account posts:

Twitter account connected to a blog

As you might notice, I activated the companion Twitter Tools: bit.ly links plugin to create shortened URLs (useful on a platform like twitter that has a 140-character space limitation).

The Commons Wiki: Realizing its Potential

From CUNY Academic Commons

The following is based on a post by Scott Voth, on Wiki Wrangler.

The Academic Commons Wiki publishes many kinds of writing – individual and group projects, grant proposals, shared lesson plans, research ideas, repositories of useful links, solutions to common problems, ideas on course management…

Our wiki lets people to work together and share knowledge.

There is something empowering when you create a wiki page. You add some headings, and a little information, and see a table of contents automatically created for you. Then you link to a page, and are able to create it automatically. You quickly enter some related content, and then maybe tag your pages, and now you have a sub-category, with an automatically generated index, listed in alphabetical order. Cool…

External links are easy to add, and you can even get a little fancy and include other media – pictures, video, PDFs, powerpoints… Get other people involved, and they can add to what you’ve done, and suddenly something much larger has been created.

According to Wikipedia, the term “wiki” comes from the “Wiki-Wiki” shuttle buses that connect the terminals at Honolulu International airport. They are quick and simple, open and transparent. With their ability to return to prior versions, authorship anxiety is lessened. Don’t like the current version? You can always go back to a previous draft. Wikis are easy to revise, and they motivate people to work together.

Wikis encourage contribution. Whether it is to share research, identify best practices, publish project reports, or aggregate technical tips or lessons learned, the Academic Commons Wiki is a great way to organize and centralize ideas. Give it a shot!

Boone Gorges, on February 25th, 2010 at 2:54 pm

Speaking as a former sometimes-Wikipedia editor, the real magic of a wiki is that you can start something, leave it for a few weeks, and then come back to see it grown and changed into something new and better than what was there before. In a place like Wikipedia this sometimes happens in a matter of hours, as the user base is so big. In a place like the Commons wiki I imagine that the process of collaborative development will be much slower (even now most pages have at most three or four editors) but it also has the potential to be much more meaningful, as our commons bonds and goals as members of the CUNY community are so much more robust than those of random Wikipedia users.

Image Handling Plugins for WordPress

From CUNY Academic Commons

There are several plug-ins available on the Commons which extend WordPress image-handling functionality.  Some make it easier to add images to blog sidebars, some provide templates and scaling mechanisms that allow users to professionally format images and text, and some create galleries and slideshows. Here’s a rundown:

Contents

Flickr Photo Album

Created by TantanNoodles, this plugin requires a Flickr account and a Flickr API key. The user configures the plugin by clicking “Photo Album” under the Settings tab on the WordPress dashboard. Once properly configured, the Flickr icon appears as the last option under “Add Media:” on the edit page. Templates may be created easily, and images scaled to meet any requirements.

Users may select images from their own Photostreams and albums, or choose the “Everyone” or “Interesting” tabs, which allow paging through images licensed under Creative Commons.

Quick Flickr Widget

This plugin lets you manage pictures on your sidebar. Once installed, click on Widgets, find “Quick Flickr Widget” and drag it to a sidebar. You will need to cut and paste your Flickr RSS feed URL which you will be able to get on your Flickr “Photostream” page. Click on the RSS icon, and copy the generated URL.  Then go back to your dashboard and paste the URL into widget configuration form. This plugin comes with a lot of customizations.

Nextgen Gallery

NextGen Gallery provides an easy way to present images in a gallery format. Not a image service like Flickr and Cincopa, NextGen integrates image storing within WordPress. Once installed, a tab called “Gallery” will be available to manage images.  Apparently if used in combination with another plugin (JW Image Rotator), slideshow functionality is possible, but the Commons does not have this plugin.

A gallery of images may be added to posts and pages through the use of “shortcodes” – by adding the following:”[nggallery id=myGalleryName].” There is a variety of configurations and effects possible.  NextGen supports CoolIris (aka “PicLens”).

Lightbox Plugin

Details for this plugin can be found here. Lightbox is widely used/mashed up with other applications. Essentially this plugin allows you to show a smaller image which, when clicked, expands to full size and “overlays” the screen. It is a nice effect.

To use this plugin natively, you will need to add some HTML to your pages or posts, but nothing very complicated. The link above gives an example, and you will only need to change the the URLs.

Photo Dropper

Photo Dropper lets you search Creative Commons by keywords. Once you find an image, select small, medium or large and the corresponding image appears in your page or post, along with a hyperlink attribution. Searching/paging can be tiresome, since only four or five results are returned at a time. Configuration is available in the dashboard, under “Settings” ==> “Photo Dropper”.

Post video players slideshow and photo galleries

The “Post video players slideshow and photo galleries” plugin, developed by Cincopa is another service which requires membership, but it offers easy and robust image-handling, including slideshows and galleries. Images are uploaded to Cincopa and managed there. Once you decide upon the images and their format, click on finish and Cincopa creates a key which you simply paste into your page or post.

Once this plugin is installed, a tab on your WordPress dashboard will be created called “Cincopa.” Click there and follow the instructions.

Cincopa is quite dynamic and allows Photos, Podcasts, Music and Video to be combined in galleries.  Many also include Lightbox effects.  The plugin also has some Flash components which can be used to enhance slideshows.
MediaWiki Cheat Sheet

From CUNY Academic Commons

Contents

Introducing Six Shortcuts

There are not that many commands that you need to know to write a wiki page, and most can be found on the Rich Editor, but in some cases it’s more efficient to know some shortcuts for formatting a wiki page.

While you can enter all these code in the Rich Editor, you need disable it to efficiently work with them. (There’s a hyperlink called “Disable rich editor.”)

Creating Sections

To create a section, simply add one to six equal marks (“=”) before and after your section heading.  Equal marks need to start at column one of your page (i.e. all the way over to the left).

  • =My Main Section=
  • ==My Sub Section==
  • ===My Sub Sub Section===
  • and so on…

The number of equals marks must be the same on each side. Font size gets smaller and colors change as you increase the number of equals marks. Max number of equals signs is six on each side.

Creating a Table of Contents

MediaWiki automatically creates a table of contents and places it at the top of your page if you have three or more sections.

If you don’t want a table of contents to appear, use the MediaWiki “magic” word __NOTOC__ at the top of your page, and the table of contents will be suppressed.

Bullet List

Have a list of items that you want to format with bullets? Simply add an asterisk before each one. Again, the asterisks must be in column one, (i.e. all the way to the left):

 
*Item one

*Item two

*Item three
 

This is rendered as:

  • Item one
  • Item two
  • Item three

Numbered List

Have a list of items that you want to number? Simply add a number sign (#) before each one. Again, the number signs must be in column one, (i.e. all the way to the left):

 
#Item one

#Item two

#Item three
 

This is rendered as:

  1. Item one
  2. Item two
  3. Item three

External Hyperlinks

The formula for an external hyperlink is an open square bracket, the url, followed by a space, then the word your want to appear as your link, and closed with a square bracket.

The following code: [http://www.loc.gov Library of Congress] will be rendered as: Library of Congress

Linking to Other Commons Wiki Pages

The formula for a link to another wiki page is two open square brackets, followed by the page name, and closed with two square brackets.

The following code:[[CUNY on ITunes U]] will be rendered as: CUNY on iTunes U.

If the page exists, you will link there directly. If the page does not exists, you will be prompted to create this page, a quick and efficient way used by many to create a new link and a new page.

Related Links


Featured RSS Feeds

From CUNY Academic Commons

Contents

Introduction

This page documents the process of generating the wiki home page “Featured” boxes. These are digests which may also provide a little information about the contents, depending upon need. For how-to documentation on how to use News Channel and RSS Reader, see the following wiki page

Issues

  • When individual pages are fed out to RSS, the whole page is rendered. Not sure if this is because there is a parameter conflict with RSS Reader extension? The default is supposed to be to just display the article’s title, and an optional parameter “text” is supposed to render the whole thing. But it seems to always display the whole thing. Also tried “number=10” parameter (to limit results), but that doesn’t seem to work either.  So as a workaround – I created digests which can be fed out.  (We could create a number of digests for each feed.)  This is not as dynamic as feeding the individual pages though…
  • The Category box appears in the feed and is ugly.  I think this can be resolved in CSS by the following:
  "#catbox {display: none;}"

I tried the MW magic word HIDDENCAT, and hid the categories, but that didn’t work too well. The category box still remained with “array” in it.

Featured Wiki Pages

News Channel Category Criteria:

RSS Feed url: https://commons.gc.cuny.edu/wiki/index.php?title=Special%3ANewsChannel&format=rss20&limit=10&cat1=Featured&cat2=F1&excat1=&wpSubmitNewsChannelParams=Create+feed

Example:

Featured Wiki Pages
Categories

[?]

Featured Wiki Resources

News Channel Category Criteria:

RSS Feed url: https://commons.gc.cuny.edu/wiki/index.php?title=Special%3ANewsChannel&format=rss20&limit=10&cat1=Featured&cat2=F2&excat1=&wpSubmitNewsChannelParams=Create+feed

Example:

Featured Wiki Resources
Categories

[?]

Featured Wiki Categories

News Channel Category Criteria:

RSS Feed url: https://commons.gc.cuny.edu/wiki/index.php?title=Special%3ANewsChannel&format=rss20&limit=10&cat1=Featured&cat2=F3&excat1=&wpSubmitNewsChannelParams=Create+feed

Example:

Featured Wiki Categories
Categories

[?]

Featured Group Wikis

News Channel Category Criteria:

RSS Feed url: https://commons.gc.cuny.edu/wiki/index.php?title=Special%3ANewsChannel&format=rss20&limit=10&cat1=Featured&cat2=F4&excat1=&wpSubmitNewsChannelParams=Create+feed

Example:

Featured Group Wikis
Categories

[?]

Recently Edited

This one is a little problematic – way too much detail… It is from Special Pages:Recent Edits” feed. Tried number=10 (parameter in RSS Reader) to limit number of results, but didn’t seem to work.

History

deleted “[[History]]” content was: ‘this is the text’ (and the only contributor was ‘Scottvoth‘)

New page

[?]

Most Active

Looking for a way to generate this one. There is a “Popular Pages” in Special Pages, but it is not a feed.

Special:PopularPages

RSS Feeds on the Commons Wiki

From CUNY Academic Commons

By Tiago Pinhal – Creative Commons

What’s an RSS Feed?

Not sure what RSS Feeds are? Check out this link for more information. RSS is short for Really Simple Syndication. RSS feeds are common (among many other places) on the sidebars of websites. If you like a blog or website or a newspaper column and want to know when the next post occurs, you may subscribe to its RSS Feed (if available). RSS feeds let you know when content changes and help control the way your news is presented.

How to Create an RSS Feed on the Commons Wiki

Follow these instructions to create an RSS feed on the Commons Wiki:

  • Identify the pages you want to include in your feed.
  • Add them to the “News” category.
  • Ideally, add them to another, unique category all your own, so that you can control what you feed out.
  • Go to “Special Pages.”  (It’s under the Wiki’s Toolbox Tab, on the right sidebar.)
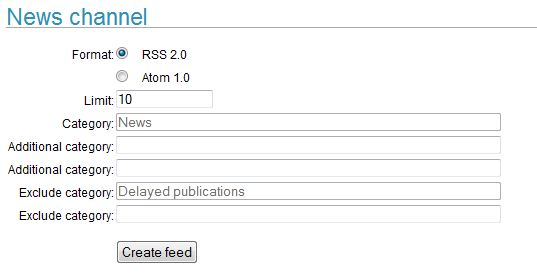
  • Scroll down to NewsChannel and click on it.  It’s at the very bottom of the page.  Attached below is a snapshot of the screen you should see.

  • Boolean logic applies here. When you add another category, it means that the wiki page needs to be in both categories. If add an exclude category, the article will not be in the feed if it is in that exclude category.
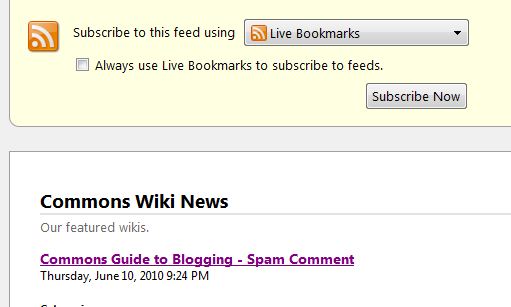
  • When you are done, click on create a feed. You should see something like the following screen. (Your content will be under “Commons Wiki News.”)

  • From here you can simply subscribe to the feed using an RSS Reader. There are many RSS Readers. This link rates them.
  • Or, you can go the the top of your browser and copy the url. You can use this url to add the feed to your blog, website, or to a Commons Wiki page.

How to Display an RSS Feed on the Commons Wiki

You can now add RSS feeds to your Wiki pages! They can be feeds from the Commons Wiki or from anywhere else. Follow these simple instructions.

  • Copy the feed url
  • Edit the wiki page where you want the feed to appear
  • Enter <rss>
  • Paste in the url
  • Enter </rss>

And you are ready to go.  There are a number of parameters which you may want to use which control how the articles are presented.  This is described by the author of the extension here. (See the section called “The rss tag.”)  You can even enclose 2 or 3 urls within the rss tags (separated by a “|”) and they will be displayed in columns.  

Related Links

  • NewsChannel – this is the MediaWiki extension that lets you create RSS Feeds.
  • RSSReader – this is the MediaWiki extension that lets you display RSS Feeds on Wiki page


Getting Started

From CUNY Academic Commons

Contents

First Steps

To register and get started on the CUNY Academic Commons, follow this
link
or just click on the “Join” image on the CUNY Academic Commons home page, under “Getting Started”:

Please note that the Commons is open to CUNY faculty, staff, and graduate students only. An active CUNY e-mail address is required to proceed. We cannot support undergraduate students or course websites at this time.

There are really only four fields that are required for initial registration. All the others are optional, and may be entered at registration time, or later (by editing user profile). Here are the minimal requirements to get started:

  1. User Name: must not have spaces – example: JaneDoe
  2. email address – must be an active CUNY e-mail address
  3. Full Name
  4. CUNY College – pick from drop-down list.  You can choose more than one college.
  5. Role – faculty, grad student, alumnus/a, postdoc, other …

You also need to read the Terms of Service and agree to them to register.

Optional Fields

While it is not necessary to enter any other fields to register, it may be convenient at this point to enter more about yourself and starting building your Commons profile. Remember all this can be updated at a later point.

The following optional fields are available:

  • Title
  • Academic Interests
  • Phone
  • e-Mail
  • Website Address
  • Blog Address
  • Twitter ID
  • IM
  • Linked-in ID
  • Flickr ID
  • youTube ID
  • FaceBook Profile Link
  • Delicious ID
  • Skype ID
  • FriendFeed ID

If some of this sounds foreign to you, don’t worry. If you don’t enter anything, the fields will not appear on your profile.

Profile Field Visibility

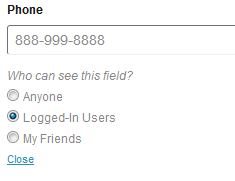
Please note that you can make these fields visible to the public, or to logged on members of the Commons, or to only your friends on the Commons. There is a “Visibility” hyperlink under each option field.  So, for example, if you want to make your phone number only visible to logged in members of the Commons, your would choose this setting:

Image:Phone.JPG

Do I want a blog?

If you know that you want a blog, you need to provide a URL and a title. The title of your blog can be changed later, but the URL will remain constant. All blogs on the commons adhere to the following URL pattern: https://xxxxxx.commons.gc.cuny.edu – where “xxxxxx” is the node that you provide here. Try to keep your blog domain name a manageable length. This will be the url you’ll want people to use to read your stuff.

Can’t decide? You can always set a blog later. You can add as many blogs as you want. Choose whether your blog is indexed and  searchable on the web or private and only known to those who know your address. For more on this, see Blog Privacy.

Completing your Registration

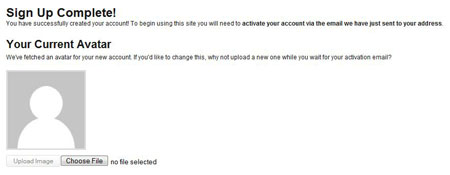
Once you have filled out the fields above, you click on “Registration Complete” and if you have filled out the required fields correctly, you should see this page:

You may browse your computer for a suitable avatar and upload the image now, or later, or change it whenever you want.

Activating your Account

The Commons will send you an email to activate your account. Just click on the URL provide to finalize your registration. You are now a member of the Commons!

Sometimes the confirmation email inadvertently ends up going to your “Junk” email folder, so if you do not receive your confirmation, please check there.

Adding Wiki Content to your Blog Posts

From CUNY Academic Commons

The Problem

You’re writing a blog post, and you’d like to include wiki content. This content might come from the Commons wiki, or a variety of MediaWiki sites like Wikipedia, Wiktionary, WikiQuotes

You can certainly just link to the wiki article. But you can also “include” the wiki page at the end of your blog post or page.

Or you can just use a blog post or page to “serve up” a wiki page.

“KwikiMart” courtesy of cogdogblog

The Quick Solution

To include a wiki in a blog post or page, first activate the “Wiki Inc” WordPress Plug-in.  (This is a one time operation – on the WordPress Dashboard, click “Plug-ins.”  Then scroll down until you see Wiki Inc.  Click the checkbox and the “Activate” hyperlink.)

Once Wiki Inc is activated, go to the edit screen of your blog post. Scroll to the very bottom of the page and you should see the follow input boxes:

Image:Wiki inc.JPG

In the first box, enter the title of the wiki page you want to include in the text of your post or page.

In the second box, enter the “Main_Page” address of wiki.

Here are some examples of Main_Pages you can use:

Limitations

  • Only one wiki page per blog post or page is allowed.
  • Wiki content must come from a MediaWiki-based wiki
  • Wiki content appears at the end a each blog or page