From CUNY Academic Commons
Widgetize Google Gadgets
A complete listing of available “Google Gadgets” is provided in the Google Gadget Directory. These gadgets are little HTML and javascript snippets created by Google and third parties which may be embedded into your website.
Widgetize Google Gadgets is a WordPress plugin that makes it easy for you to include these gadgets in any widgetized area your theme provides.
There are gadgets that create customized search engines which only look in the domains you choose. There are gadgets that provide weather forecasts, quotes, jokes or poems of the day. Some gadgets simply provide themed slideshows. The New York Times gadget provides a configurable tabbed feeds of the day’s news. There are over 200,000 to choose from, and the list is growing daily. Google provide a standard Google Gadgets API (Application Programming Interface) so that these gadgets can be created quickly. Some, especially the ones created by Google, also include advertising.
How to Use the plugin
Step One
Activate the plugin. Go to your WordPress dashboard, scroll down to the Plugins tab. From there, find “Widgetize Google Gadgets” and click “Activate.”
Step Two
Find a gadget in the directory. This list is enormous, but Google (being Google) provides a robust method of searching for what you want.
Step Three
Configure you widget. Follow the directions. You may need to resize it so that it fits where you want it to go. Choose the border that you want to surround it. Finally, copy the code that is automatically generated.
Step Three
On your WordPress dashboard, go to Appearance>>Widgets:
Here you see all the widgetized areas available. Drag the “Google Gadgets” icon to your widget area, give it an optional title, and paste the code into the appropriate area.
Google Maps Embed
Planning a meeting with colleagues? Writing about an area unfamiliar to most readers? Announcing a conference? The Google Maps Embed plugin is an effective way to add geographical information to your blog posts or pages. You can quickly and easily embed a Google map and provide directions to an event or highlight a unfamiliar area.
How to use this Plugin
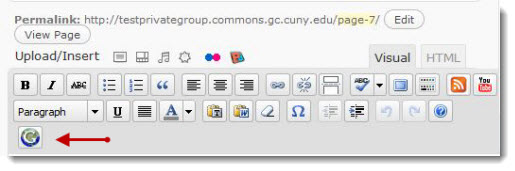
As with all new plugins, you will need to activate it. (This is a one time process.) Once activated, a Google Embed icon will appear on the edit page and post:

Step One
Go to Google and search for a map of the place your wish to highlight. Adjust the zoom appropriately.Copy the url.
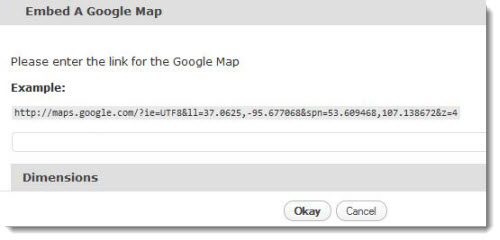
Step Two
Go to your WordPress dashboard, and edit your post or page. Click on the Google Embed icon. You should see this popup:

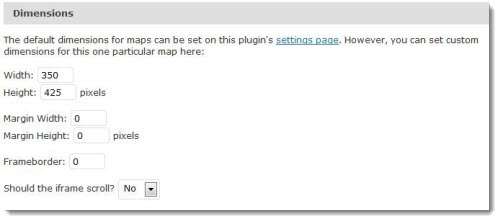
If you click on “Dimensions,” you may alter the dimensions of your map. See the various options below:

Paste in the url and click save, and you should see your map embedded.
The following quick screencast